Brie and Blackberry French Toast

I can’t believe that it’s already Christmas Eve! Where does the time go? Fortunately, all of my gifts are bought and wrapped, and I’m ready for Santa to come tonight even if the holiday did sneak up on me. What I didn’t prepare for was a delicious Christmas breakfast. So I scrolled back through my Instagram and found one of my favorite easy and slightly decadent breakfast recipes that would be perfect for tomorrow morning.

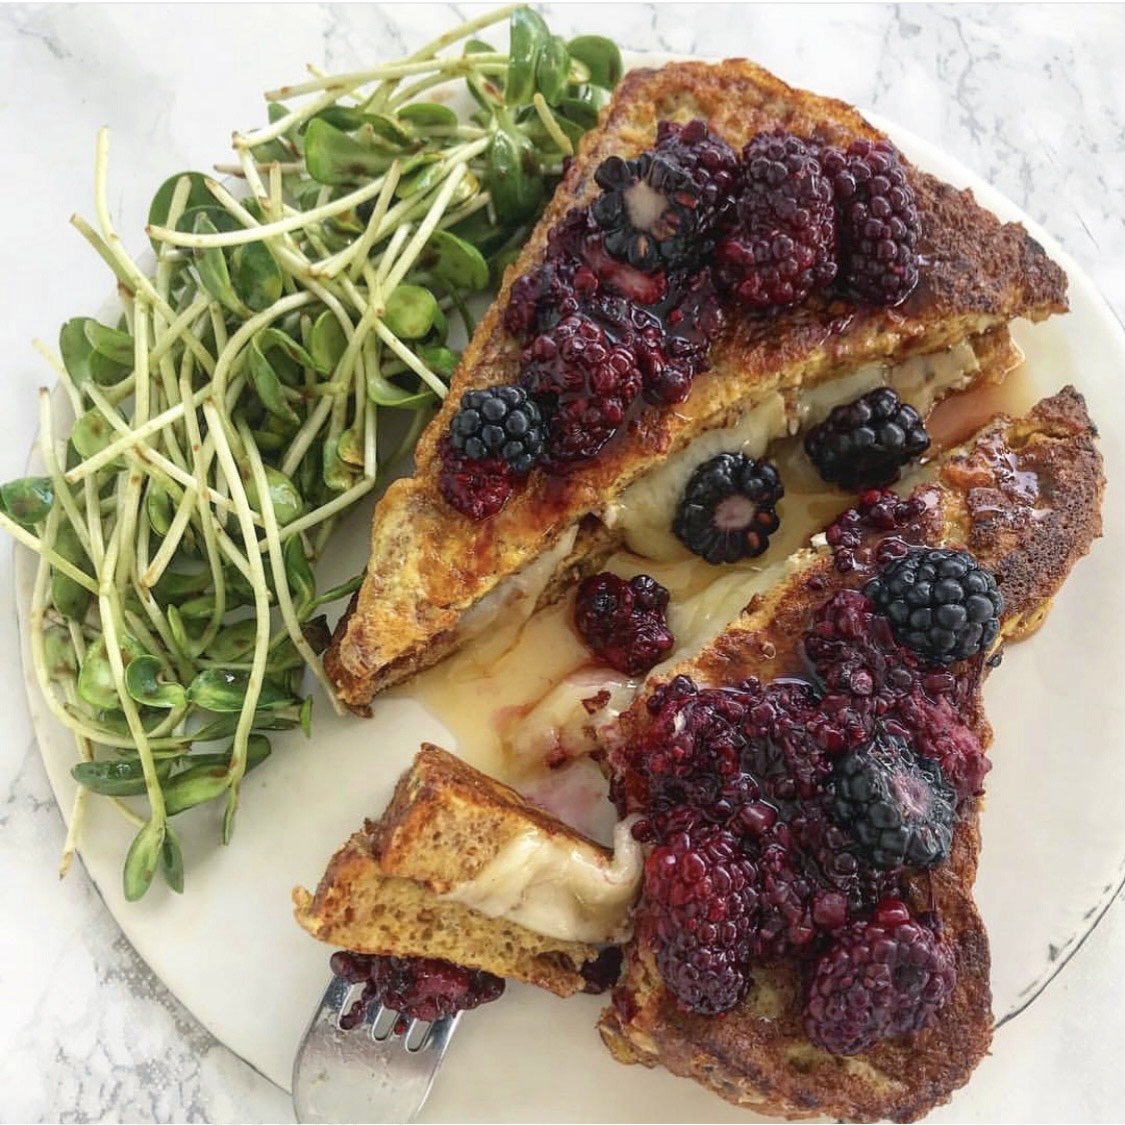
This brie and blackberry French toast is super easy to make and the perfect sweet (but not too sweet) breakfast option. Don’t have blackberries? No problem! Strawberries and blueberries would also work great or even a frozen berry medley that you might have on had for smoothies! So let’s get to it:

Here’s What You’ll Need:

  • 4 pieces of bread of choice

  • 4 eggs

  • 1/4 cup milk

  • 1/2 tsp cinnamon

  • 4 oz brie (or more or less depending on preference)

  • 1/2 cup blackberries

  • 1 tsp chia seeds

Instructions:

  1. In a shallow bowl, whisk together the eggs, milk, and cinnamon.

  2. Dip the slices of bread (both sides) into the mixture, fully coating.

  3. Cook the bread in a greased pan over medium heat on the stovetop until golden brown, flip and repeat on the other side.

    Once cooked, spread the brie on one side of one piece of the warm bread and top with a second slice. This should melt the brie. If not, you cant return them to the pan for a few minutes to do so. Repeat with the other slices.

  4. In the meantime, heat up the berries in a sauce pan over medium high heat. As they start to cook down, mix in the chia seeds to form a bit of a jam. Top your French toast with the blackberry mixture and a drizzle of maple syrup and enjoy!

Let me know how you enjoy yours and what you think in the comments below. Merry Christmas!

Tuna Apple Pasta Salad

It’s been one of those weeks where I haven’t gone food shopping and have limited ingredients on hand, so a pantry staple meal was a bit of a must. This tuna apple pasta salad is my absolute go-to. It’s the perfect lunch, dinner, or side and has been a favorite of mine for years! It’s made with five simple ingredients, three of which are pantry staples. The flavor combo may sound a bit weird, I know, but, trust me, it’s amazing!

Making this tuna apple pasta salad is always a bit of a comfort for me. I feel like pasta dishes are always a bit comforting, and this one specifically reminds me of my mom. She first made this for me when I was in high school after adapting it herself from some recipe she found. Since then, I’ve been making it for myself (and friends) on repeat with a few tweaks over the years. It’s super simple, and you can make a nice batch to last you for the week (although it will probably be gone in a day or two in my experience).

Here’s What You’ll Need:

  • 8 oz cooked pasta of choice (I like to use chickpea pasta to make it GF)

  • 2 cans tuna, drained

  • 4 celery stalks, sliced

  • 1-2 granny smith apples (depending on size), cubed

  • 1/2 cup avocado oil mayo (or mayo of choice)

  • Salt and pepper to taste

Instructions:

  1. Mix together the cooked pasta, tuna, celery, apple, mayo, and salt and pepper to taste.

  2. That’s it! Enjoy!

Whether you’re enjoying this for lunch or making it as a side for a party, it’s sure to be a hit. Let me know what you think in the comments below!

Balsamic Roasted Brussels Sprouts with Bacon

I can’t believe Thanksgiving is less than a week away! When it comes to Thanksgiving, it’s all about the sides. You’ve gotta have a great stuffing, potatoes of course, and I always love a delicious veggie side dish. One of my favorite go-tos is this super simple and flavor-packed roasted brussels dish with crispy bacon, pumpkin seeds, and a balsamic drizzle to bring it all together. It’s a super tasty way to get in those veggies that the entire family will love!

Here’s What You’ll Need:

  • 1 large bundle of brussels sprouts, de-stemmed and sliced

  • 4 pieces bacon

  • 1/4 red onion, chopped

  • 1/4 cup pumpkin seeds

  • 1-2 tbsp balsamic vinegar

  • 1-2 tbsp avocado oil

  • Salt and Pepper to taste

Instructions:

  1. Toss the brussels sprouts in avocado oil, sea salt, and pepper and roast in a preheated 425 degree oven for for 20-25 minutes until browned and crispy.

  2. In the meantime, cook up the bacon on the stove top until crispy.

  3. Remove the bacon and chop it into small pieces. Remove excess bacon grease from the pan, leaving about 1 tbsp.

  4. Cook up chopped red onion and pumpkin seeds for 3-5 minutes in the pan on the stovetop.

  5. Once cooked, mix the Brussels sprouts, red onion, pumpkin seeds, and bacon.

  6. Serve and top with a drizzle of balsamic. Enjoy!

Let me know what you think in the comments below!

Buffalo Cauliflower Dip

It’s football Sunday which means it’s time to get out those delicious snacks and dips! This buffalo cauliflower dip has been a favorite of mine for years, and it never disappoints. It’s vegetarian, gluten free, and gets in those sneaky veggies while still feeding those buffalo cravings. It’s super easy to whip up, so you can easily have it ready in time for today’s games. Let’s get to it!

Here’s What You’ll Need:

  • 1 head of cauliflower, cut into florets

  • 8 oz shredded cheddar

  • 8 oz cream cheese

  • 1/2 cup ranch dressing

  • 3/4 cup buffalo sauce

  • 1 green onion, chopped

  • 2-4 tbsp blue cheese crumbles (optional)

  • 2 tbsp avocado oil

  • Salt and pepper to taste

Instructions:

  1. Toss the cauliflower florets with avocado oil, salt, and pepper, and roast in a preheated 450 degree oven for 30 mins.

  2. Once cooked, “shred” the cauliflower using a fork, breaking the florets apart into smaller pieces.

  3. In a large bowl, combine the shredded cauliflower, shredded cheddar, cream cheese, ranch dressing, and buffalo sauce, and mix together well. Pour the mixture evenly into a square baking dish.

  4. Bake in a preheated 350 degree oven for ~25-30 mins.

  5. Top with green onion and crumbled blue cheese as desired. Serve with your favorite veggies, tortilla chips, or crackers, and enjoy!

Let me know what you think in the comments below!

Spicy Honey Smashed Potatoes with El Yucateco

This post is sponsored by El Yucateco® and all opinions are my own.

Can you even believe the holiday season is already upon us? It certainly came up quick, but I am definitely ready! I'm that person that had out the lights and festive colored pillows on November 1st. There's really nothing I love more than the holidays, and more specifically, the delicious holiday food!

So, of course, I've already been recipe testing some new ideas and was really feeling like it's time to spice things up this season! That's where this spicy honey smashed potato recipe comes in. I love a good potato recipe, but I wanted something a little more fun, delicious, and with that extra flavor!

These potatoes are made with El Yucateco® Red Habanero Hot Sauce which is the #1 habanero sauce in the US and is made from the whole fruit of the pepper. It's a non-vinegar based hot sauce with the most perfect flavor that really is the star of this recipe. Whether you're heating up the holidays with these smashed potatoes, spicing up your own favorite holiday recipe, or just looking for a delicious gift or stocking stuffer, El Yucateco® is the way to go!

So let's get to it!

Here's What You'll Need:

Instructions:

  1. Cook your creamer potatoes until tender and easily pierced by a fork. You can do this by microwaving them for about 5 minutes or by boiling them.

  2. In a bowl, mix together the El Yucateco® Red Habanero Hot Sauce, melted ghee, EVOO, honey, salt, and pepper.

  3. Toss the potatoes with the mixture.

  4. Spread out the potatoes on a parchment lined baking sheet, reserving any extra sauce.

  5. Using the bottom of a jar or mug, smash the potatoes on the baking sheet.

  6. Bake the potatoes in a preheated 450 degree oven for 20 minutes.

  7. Flip the potatoes and bake for an additional 10 minutes until crispy.

  8. Drizzle any extra sauce over the top of the potatoes and top with the chopped green onion.

  9. Serve and enjoy!

Let me know what you think in the comments below!