Healthy Recipe

Gluten Free Avocado, Strawberry, and Arugula Waffles

Waffle Wednesday, we meet again, and I couldn't be happier. Seriously, this is like my favorite food day of the week. It makes me want to open a brunch place specializing in waffles. The waffle maker has officially become my favorite kitchen appliance to play around with. So what do we have this week? Gluten free avocado, strawberry, and arugula waffles, and you will not be disappointed.

The idea stemmed from a couple of places. I see all sorts of fun and creative things on Instagram, and recently I've been seeing a lot of avocado toast topped with strawberries. So that got me thinking. It's really not that weird when you think about it. A delicious summer salad could be topped with both of these. That's where the arugula came in. It's like a summer salad in waffle form. And who isn't wishing for summer in this unseasonable 40 degree April weather?

Don't have quinoa flour? No problem! Swap it out for the flour of your choosing. Whole wheat is a good option of you aren't gluten free, or really feel free to use whatever suits your fancy!

Here's What You'll Need:

-3/4 cup quinoa flour (or the flour of your choosing)
-1 tsp baking powder
-1 egg
-1/2 cup unsweetened almond milk
-1/4 cup water (you can use all almond milk or all water if you prefer)
-1 tbsp coconut oil, melted
-Pinch of sea salt (optional)
-1/4 cup baby arugula
-1/2 avocado
-4 strawberries, chopped

Instructions:

1) Heat up your waffle maker.
2) Mash the avocado half in a bowl using a fork.
3) Add in the flour, egg, baking powder, almond milk, water, salt, and coconut oil and thoroughly mix together.
4) Fold in the strawberry chunks and arugula.
5) Pour half of the mixture into your waffle maker and cook according to your makers' instructions.
6) Repeat with the second half of the mixture. 
7) Serve each waffle and top with desired toppings.

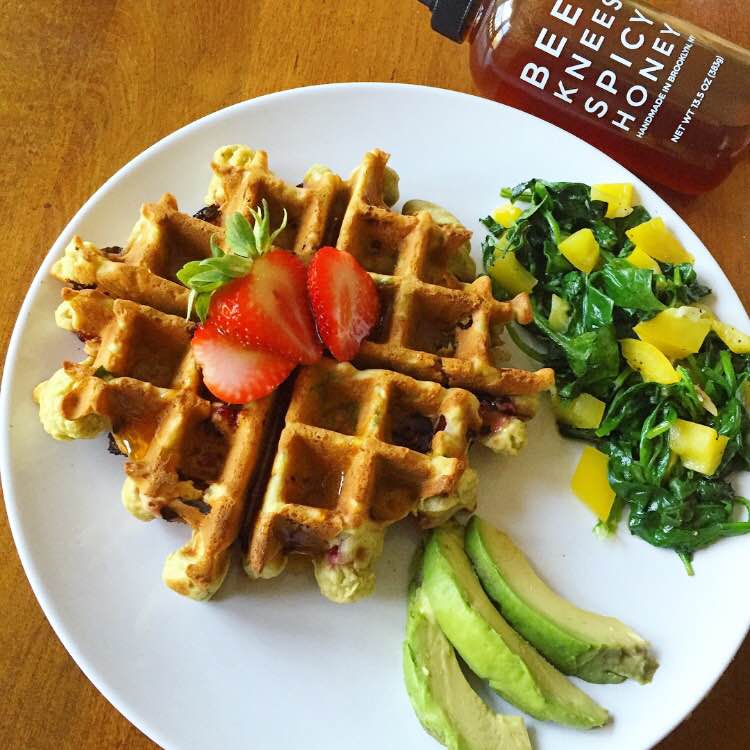
I topped mine with an additional strawberry and Bushwick Kitchen's Bees Knees Spicy Honey, and I would HIGHLY recommend this. The honey is the perfect flavor addition to the avocado, strawberry, and arugula. Plus is has that nice little kick.


Let me know what you think in the comments below!

Blueberry Chocolate Chunk Whole Wheat and Rolled Oat Waffles

If you follow me on Instagram, you know by now that I recently purchased a waffle maker. I've wanted to buy one for months after trying some frozen healthy waffles and literally thinking to myself, "I could do so much better." Soon after that experience, I stumbled upon more relatively healthy waffles that were actually really good, delaying my waffle maker purchase.

But it finally happened last week, and let me tell you, IT WAS WORTH IT! Also, WHAT WAS I THINKING? Waiting this long to buy my own waffle maker seriously feels like a crime. This baby turns out delicious, perfect looking waffles. Plus, I can play around with whatever recipe I want (added bonus). 

Another fun thing that happened last week, I received my first Cocoa Couriers box (I'll link my review here). So when waffle Wednesday approached, I knew one of those babies was going into my waffle. It was pretty much a no brainer because the Blueberry chocolate bar by Brasstown was pretty much the most delicious thing I've tasted in my life. Also, blueberries, chocolate, and waffles - need I say more?

Here's What You'll Need:

-1/3 cup whole wheat flour
-1/3 cup rolled oats
-1 tsp baking powder
-Pinch sea salt
-Sprinkle of cinnamon (probably like 1/8 tsp)
-1 egg
-2/3 cup unsweetened almond milk
-2 tbsp coconut oil (melted)
-1/2 Brasstown Blueberry chocolate bar, cut or broken into small chunks (you can use any dark chocolate bar of your choosing)
-1/2 cup blueberries
-2 tbsp maple syrup

Instructions:

1) Heat your waffle maker.
2) In the meantime, mix together all of the ingredients (minus the maple syrup) in a bowl. You can reserve some chocolate chunks and blueberries to top your waffles, or just throw it all in. It's all going to one place, your mouth.
3) Pour half of the mixture into the waffle maker and cook according to your waffle maker's instructions. Repeat this for the second waffle.
4) Serve each and top with 1 tbsp of maple syrup.
5) Enjoy!

Let me know what you think in the comments below!

Spiced Pear Oat Parfait

Sorry for rolling out all the oat recipes on you, but hey, it's winter, and oats are warming AND delicious! This one's a little bit of a twist because I decided to throw them into a parfait, and it is seriously BOMB!

Here's what you'll need:

-1 cup rolled oats
-2 cups unsweetened almond milk (or your milk of choice)
-1 tbsp and 1 tsp maple syrup, separated
-1 tbsp and 1/2 tsp cinnamon, separated
-1 tsp nutmeg
-dash of sea salt
-1 /2 pear, chopped
-1 tbsp ground flax seed
-1 tbsp chia seeds
-1 6 oz container of nonfat plain Greek yogurt
-1 (0.36 oz) package of Crispy Green Snacks freeze dried Asian pears
-2 tbsp slivered almonds

Instructions:

1) In a pot on the stove top, heat up the oats and almond milk on high heat until boiling.
2) Once boiling, reduce the temperature to low and begin stirring regularly.
3) Once the oats begin to thicken a bit (about 3-5 minutes), add in 1 tbsp maple syrup, 1 tbsp cinnamon, the nutmeg, sea salt, flax seed, chia seeds, and chopped pears.
4) Continue to stir the oats until they become thick and the consistency of oatmeal (another 3-5 minutes). Remove from heat.
5) In a bowl, mix together the Greek yogurt, remaining cinnamon, and remaining maple syrup. 
6) Begin layering your parfaits - do one layer (about an inch thick of the oatmeal followed by a thinner layer of the Greek yogurt mixture followed by the crispy pears and finally the almonds. Repeat until both parfaits are complete.
7) Enjoy!

If you aren't a fan of pears, you can easily switch them out for apples (and Crispy Green Snacks does make freeze dried apples as well). I like using Crispy Green Snacks because 1) they're non GMO verified and 2) they're pure fruit which means no added sugar like a lot of dried fruit. Let me know what you think in the comments below! I look forward to hearing from you!

BBQ Chicken Salad with Greek Yogurt BBQ Ranch Dressing

3.jpg

With the summer season coming to a close, I found myself craving barbecue. I got a little sad for a second because barbecue food tends to be associated with grilling and summer. But then I caught myself; it doesn't have to be! 

This recipe kind of holds onto that summer feeling and taste, but it's prepared and cooked all inside. So when we eventually get to that first really chilly fall night, we can still have a little taste of summer right in the comfort of our own homes.

Here's what you'll need:

For the dressing:

-1/4 cup nonfat Greek yogurt
-1/2 tsp dried parsley
-1/2 tsp garlic powder
-1/2 tsp onion powder
-1/2 tsp German mustard
1/2 tsp lemon juice
-1 tsp BBQ sauce
-1 tbsp unsweetened almond milk
-salt and pepper to taste

For the rest of the meal:

-1/2 Japanese sweet potato, chopped into small cubes for (croutons)
-2 tsp olive oil
-1/2 avocado, diced
-1/2 tomato, diced
-1/8 red onion, chopped
-2 chicken breasts (4 oz chicken breast used for nutrition information)
-4 tbsp BBQ sauce
-4 cups baby kale
-salt and pepper to taste

Instructions:

1) Preheat your oven to 450 degrees.
2) in a bowl or bag mix the sweet potato with the olive oil, salt and pepper. Arrange the potato on a baking sheet to form a single layer.
3) Slather the BBQ sauce onto both sides of the chicken breasts, and put them on a baking sheet.
4) Once the oven in preheated, you can put both baking sheets (or one if you put everything on one) into the oven. 
5) After 10 minutes, used a spatula to move the sweet potato pieces around (flipping them over the best you can). Also flip over the chicken breasts. Place all the food back into the oven and continue to cook.
6) After 5 more minutes (15 minutes total) remove the sweet potato pieces, and set them on a plate to cool.
7) After 5 more minutes (20 minutes total) remove the chicken.
8) While the food is cooking you can mix together all of the dressing ingredients in a bowl.
9) Split the kale between two bowls. Top each with tomato, onion, and avocado.
10) Add the sweet potato "croutons" to each bowl.
11) slice the chicken breasts into strips and top each bowl with one breast.
12) Drizzle half of the dressing onto each bowl, and enjoy!

I hope you enjoy this as much as I did! This may be one of my favorite recipes to date! Let me know what you think in the comments below, and feel free to subscribe for e-mail updates.

Shrimp Cobb Salad with Lemon Vinaigrette

Shrimp has been one of my favorite foods since I was a little kid. It has a nice flavor, provides protein, and is still light and low calorie.

I knew that I had shrimp at home and was really feeling a nice salad. I started going over the things I had in my fridge and literally couldn't think of anything. Then I thought about the bacon I randomly had leftover from a couple days ago (random because I never buy bacon). Shrimp wrapped bacon? That sounds delicious but not exactly what I was looking for.

I sifted through the limited other ingredients I had lying around, and each one fit perfectly into a summer-inspired lighter cobb salad. Instead of heavy bleu cheese or ranch, I could make a nice citrus vinaigrette and cut out the cheese.

Here's What You'll Need:

For the Salad:
-4 cups of baby spinach
-10 cherry tomatoes cut into thirds
-1/2 avocado, chopped
-1 ear of corn, kernels removed from cob (or 1 small can of corn, drained)
-2 slices of bacon
-2 hardboiled eggs, chopped
-6 oz shrimp
-1/4 tsp of paprika
-salt and pepper to taste

For the Dressing:
-The juice of one lemon
-1 tbsp olive oil
-1 tbsp white wine vinegar
-1/2 clove garlic, minced
-1/8 tsp oregano
-salt and black pepper to taste

Instructions:

1) If you haven't already, cook your bacon slices in a pan or microwave until they are crispy, and chop them into small pieces.
2) If you haven't already, hard boil your eggs (you may also buy them already cooked). Chopped up the eggs.
3) Add the paprika, salt, and pepper to your shrimp and cook on a grill or in a pan on the stove. If you are using pre-cooked shrimp, I still suggest adding the seasoning and just heating up the shrimp a bit using either method.
4) You can either add all the ingredients into one large bowl or split ingredients in half and serve separately.
5) Mix together the dressing ingredients, add to the salad(s), and enjoy!

If you are hesitant about the dressing, please try it! It is seriously delicious in the salad. It balances so well with the egg, shrimp, and bacon and gives just that extra bit of added flavor to this meal. Let me know what you think, and feel free to subscribe below!